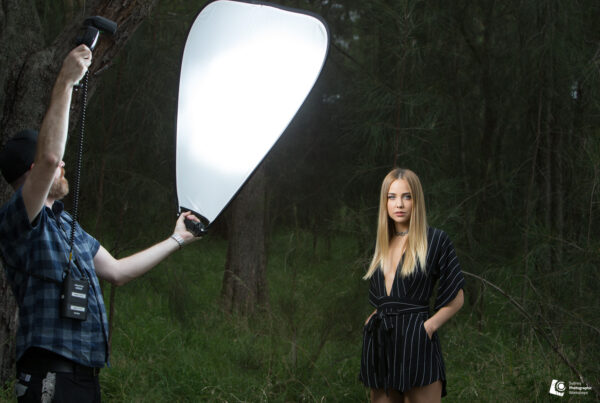
One of the questions I often hear from photographers learning portraiture is whether they should be using flash.
Many are perfectly comfortable photographing people in natural light, but the moment a flash enters the equation, things can become a little more complicated. Suddenly there are more settings to consider, another piece of equipment to manage and the possibility of making the photograph look worse rather than better.
I can understand the hesitation. At Sydney Photographic Workshops, we’ve seen portraits where the flash is far too obvious, with harsh shadows, shiny faces and backgrounds that have almost disappeared. It’s enough to put some photographers off using flash altogether.
But flash doesn’t have to look like that. I use it regularly in my portrait and commercial photography, sometimes in situations where there’s already plenty of available light. At other times, I might only introduce a very subtle amount of fill, barely noticeable in the finished photograph.
The decision really comes down to what the existing light is doing and whether it’s giving me the result I want.
Assessing the Available Light Before Using Flash
Before introducing flash, I want to understand what I’m working with. Where is the light coming from? How is it falling on the subject’s face? What’s happening in the background? And what sort of photograph am I trying to make?
Sometimes the available light is beautiful, and there’s very little reason to interfere with it.
A person standing beside a large window might already have soft, directional light across their face, with enough shadow to give the portrait shape. If the background is working and the exposure is manageable, I may have everything I need.
Other times, the location might be interesting but the light isn’t doing the subject any favours. Perhaps the face is too dark compared with the background, or the light is coming from directly overhead and creating deep shadows around the eyes. You might have found a wonderful composition, but the direction of the available light doesn’t particularly suit the person standing in it.
Before reaching for the flash, I’ll consider whether moving the subject or changing my camera position might solve the problem. Sometimes a small adjustment is all that’s needed, particularly when you’re working with a large natural light source such as a window.
But there are situations where I like the background, the composition and the position of the subject, and I’d rather change the light than change the photograph.
That’s when flash becomes useful.
Using Fill Flash in Bright Daylight
Photographers often associate flash with dark conditions, but one of its most useful applications is outdoors in bright daylight.
Imagine photographing someone with the sun behind them. You might have beautiful backlighting around their hair and shoulders, but their face is now in shadow. If you expose for the face, the background may become much brighter than you intended.
You could reposition the person or introduce a reflector to bring some of the sunlight back towards them. A small amount of fill flash gives you another option.
By adding a little light to the face, you can maintain the backlit appearance while bringing the subject into a more useful exposure range. The flash doesn’t necessarily become the dominant light source. It may only be opening up the shadows or adding a little catchlight to the eyes.
The trick is finding a balance that suits the photograph.
Too much flash and the subject can begin to look unnaturally bright against the background. Reduce the contribution and the portrait may retain the feel of the original scene, with a little more detail where you need it.
I generally prefer to begin with less flash and increase it if necessary. It’s much easier to recognise what a small amount of additional light is contributing when you’re not overpowering everything else.
Of course, daylight fill has its limitations. A small Speedlite isn’t necessarily going to compete with strong midday sunlight, particularly when you’re pushing the light through a softbox. You need to understand how much power is available and whether the setup is practical for the conditions.
Controlling the Subject and Background with Flash
Another application I particularly enjoy is using flash to control the brightness of the subject independently of the background.
This is something I demonstrate during our Portrait Photography Workshops because it gives photographers considerably more control over the appearance of a location.
At one of our recent workshops, we were photographing a model in a beautiful timber-lined interior. There was some natural light entering the room, along with warm ambient lighting that contributed to the character of the space.
We could have photographed using the available light alone, but I wanted to show students how introducing a Speedlite would allow us to change the relationship between the subject and the background.
We began by establishing an exposure for the existing light, then made the background a little darker. That gave the photograph a moodier appearance, but it also meant the subject needed more illumination.
Rather than simply pointing a flash at the model, we positioned a Speedlite in a softbox to follow the direction of an existing light source. By feathering the light slightly, we could illuminate the subject without making the added light appear too obvious.
The interesting part came when we started changing the balance.
We could make the background darker while maintaining a suitable exposure on the subject, or bring more of the ambient light back into the photograph. The warm timber and existing room lighting were still part of the picture, but we now had more say over how prominent they appeared.
That’s one of the things I enjoy about combining flash with available light. It gives you the ability to reinterpret a location rather than accepting the existing lighting exactly as you found it.
Balancing Ambient Light and Flash Exposure
When you begin introducing flash, it’s useful to think about the two contributions to your exposure.
There’s the ambient light, which might be daylight, room lighting or a mixture of both, and there’s the light coming from the flash. Although they combine in the finished photograph, we can control them somewhat independently.
With a conventional flash exposure at or below the camera’s normal flash synchronisation speed, shutter speed controls how much ambient light is recorded. Because the flash produces a very brief burst of light, changing shutter speed within that range has little effect on the flash exposure itself.
This means I can often make the background darker by increasing the shutter speed, while maintaining the flash exposure on my subject.
Aperture and ISO affect both ambient and flash exposure, while flash power gives me another way to control how brightly the subject is illuminated.
In practice, I find it easier to begin with the flash switched off. I’ll establish the ambient exposure I want, paying particular attention to the background and how much of the existing atmosphere I want to retain. Then I’ll introduce the flash and adjust its contribution until the subject looks right.
There are a few qualifications worth understanding. If the ambient light is contributing significantly to the subject’s exposure, changing shutter speed will affect the face as well as the background. High-speed synchronisation also changes how the flash behaves, so the same rules don’t apply quite so neatly once you’re working beyond the normal sync speed.
But for most straightforward portrait setups, thinking about the ambient exposure first and the flash exposure second gives you a dependable method of working.
And once you understand that relationship, you can begin making much more deliberate decisions about the balance of light within the photograph.
Choosing the Flash Position and Light Quality
A lot of photographers’ early experiences with flash involve a small light mounted directly on top of the camera, pointing straight at the subject.
That produces a particular look, usually with fairly frontal illumination and sometimes quite distinct shadows.
There’s nothing inherently wrong with direct flash. In fashion and editorial photography, for example, that harder, more immediate style of lighting can be exactly what you’re after.
But if I want something softer and more directional, I’ll often move the flash away from the camera.
Positioning a Speedlite to one side can produce light similar to what you might find beside a window. You can decide how much of the face receives direct illumination, where the shadows fall and how much separation you want between the subject and background.
The apparent size of the light source is also important. A bare Speedlite is relatively small, so it tends to produce harder shadows with sharper transitions between highlight and shadow.
Put that same Speedlite into a softbox, or bounce it from a suitable wall, and you’ve created a much larger effective light source. The shadows become softer and the light wraps around the subject more gradually.
I often use a single Speedlite with a small softbox because it’s a compact and flexible setup for location work. It allows me to make quite significant changes to the quality and direction of the light without carrying a large amount of equipment.
I’ll also experiment with feathering the light, angling the softbox so the subject is illuminated by the edge of its beam rather than the centre.
Sometimes a small change to the position or angle of a light makes more difference than increasing its power.
And while softer light is often flattering for portraits, it isn’t necessarily what every photograph needs.
I might deliberately choose harder directional light for a portrait of an athlete, for example, where stronger shadows and increased texture help communicate the character of the subject.
I’m not particularly concerned about whether somebody can tell that flash was used. What matters is whether the quality and direction of the light suit the photograph.
TTL and Manual Flash: Choosing the Right Mode
Modern Speedlites are remarkably capable, particularly with through-the-lens metering, usually referred to as TTL.
With TTL, the camera and flash work together to calculate an appropriate flash output. If the distance to your subject changes, or you adjust the aperture, the system can respond automatically.
This is particularly useful when you’re moving around, photographing people at different distances or working in changing conditions.
I use TTL quite often, but I also understand that the camera’s calculation isn’t always going to produce exactly what I want.
A dark subject against a dark background, for example, may cause the metering system to deliver more flash than I intended. That’s where flash exposure compensation becomes useful. I can reduce the output without abandoning the convenience of automatic metering.
Manual flash gives you a different kind of control. You choose the power output yourself, which is particularly useful when the lighting arrangement and distance to the subject remain fairly consistent.
Once you’ve established the exposure, you can photograph a sequence without the flash changing its output from one frame to the next.
I use both approaches depending on the circumstances. There are good reasons to choose either, and I don’t see much value in making the process more complicated than it needs to be.
When to Leave the Flash in the Bag
Quite often, the available light is giving me everything I need.
I might have beautiful window light, a strong backlit portrait or an interesting mixture of warm and cool light that contributes to the atmosphere of the location.
Introducing flash could change the character of that scene, and not necessarily for the better.
There are also practical considerations. Light stands can limit where you work, softboxes can become difficult to manage in windy conditions, and flash may be intrusive in locations where other people are going about their day.
I wouldn’t automatically try to eliminate every deep shadow or correct every uneven lighting condition. Sometimes those characteristics are precisely what make the photograph interesting.
The more you work with different lighting conditions, the easier it becomes to recognise when flash will improve the photograph and when you’re better off working with what’s already there.
Practising with Fill Flash
If you have a Speedlite, one of the most useful exercises you can do is photograph the same subject with different amounts of flash.
Find someone who’s happy to sit for a portrait, preferably in a location where their face is a little darker than the background. A shaded area with a brighter background can work well.
Begin without flash and establish an exposure that gives you the background brightness you’re after. Make a photograph and pay attention to the shadows on the face.
Now introduce the flash. If you’re using TTL, start with flash exposure compensation at zero and make another photograph, keeping your camera position and exposure settings the same.
Compare the results, then reduce the flash compensation and photograph the subject again.
Look at how the relationship between the subject and background changes. Pay attention to the shadow detail, the catchlights in the eyes and whether the additional light looks natural or obvious.
If your equipment allows it, try moving the flash away from the camera or bouncing it from a suitable neutral surface. You’ll begin seeing how the direction and apparent size of the light source change the result.
Keep your shutter speed within your camera’s normal flash sync range for this exercise, unless you’re familiar with high-speed sync.
The point is to learn what the flash is contributing, so you can make a considered decision about how much of it the photograph needs.
Learning Flash Photography at Sydney Photographic Workshops
During our Portrait Photography Workshop, we begin by exploring the available light and gradually introduce reflectors, modifiers and artificial lighting as the day progresses.
Students work with models in real locations, learning how to recognise when additional light would improve a portrait, how to balance it with the existing environment and how to control its direction and quality.
The workshop also provides opportunities to experiment with portable Speedlites and other lighting equipment, depending on the location and the photographs we’re working towards.
For upcoming dates and full details, visit the SPW Portrait Photography Workshop page. You can also call us on (02) 9699 4255 or submit an enquiry through our online contact form.