When I arrive at a location to photograph someone, one of the first things I look at is the light.
Where is it coming from? What is it falling onto? Are there interesting areas of shadow, or surfaces that might be reflecting light back into the scene?
A location can look quite ordinary until you begin noticing these things. A large window might be casting beautiful light across part of a room, or a shaded doorway may provide a more interesting place to photograph than the impressive background you originally had in mind.
Equally, a spectacular location can be surprisingly difficult to photograph in if the light isn’t working for you.
Learning to recognise these opportunities is one of the most useful skills a portrait photographer can develop. It allows you to make better decisions about where to position your subject, how to compose the photograph and whether you need any additional lighting equipment.
It’s also something I spend quite a bit of time exploring during our Portrait Photography Workshops.
I often explain that there are four main characteristics of light worth understanding: quantity, quality, colour and direction. Whether we’re working with daylight from a window, a small LED or a studio flash, those characteristics influence how the subject appears.
Understanding what they look like in practice is far more useful than memorising a collection of lighting diagrams.
Understanding Light Direction and Its Effect on Portraits
A good place to start is by observing the direction of the light.
Imagine someone standing beside a large window. If they’re facing towards it, their face may be illuminated relatively evenly. Turn them slightly away and you’ll begin to see a difference between the brighter and darker sides of the face.
That difference gives the face shape.
Continue turning the person and the shadows become more prominent. Depending on the position of the window and the surrounding surfaces, you may end up with a much more dramatic portrait.
Nothing about the lighting equipment has changed. You’ve altered the relationship between the subject and the light.
This is one of the reasons I encourage students to move around and observe what happens before becoming too involved in the camera settings.
A light coming from directly behind the camera tends to reduce the shadows that describe the shape of the face. Move the light to one side and those shadows become more apparent, revealing the contours of the nose, cheeks and jaw.
There’s no single direction that works for every portrait.
A relatively frontal light might suit a clean, understated headshot. Stronger side lighting may be more appropriate when you want to emphasise someone’s features or create a particular mood.
You can also place the light behind the subject and work with the way it outlines their hair, shoulders or clothing.
The important thing is recognising what each direction contributes to the photograph.
Understanding Light Quality Through Shadows
Photographers often describe light as hard or soft. Those terms refer primarily to the character of the shadows it produces.
Hard light creates a more clearly defined transition between illuminated areas and shadow. Soft light produces a more gradual transition.
The apparent size of the light source, relative to the person being photographed, has a major influence on that difference.
Direct sunlight generally behaves like a relatively small light source because, despite the sun’s enormous physical size, it occupies a small area of the sky. It can produce strong, sharply defined shadows, particularly around the middle of the day.
A large window or a broad area of overcast sky can provide much softer illumination because the light is reaching the subject from a wider range of directions.
This is why the softness of a light isn’t determined simply by how bright it appears.
A large, soft light can be extremely bright. A small light source can produce hard shadows even when its output is relatively low.
When photographing someone, I like students to look carefully at where the shadows begin and how quickly they become dark.
Consider the shadow beneath the nose, for example. Is there a distinct edge, or does the light fall away gradually? What happens beneath the chin? Is the eye socket becoming too dark, or does the shadow help give the face shape?
Those observations tell you considerably more about the quality of light than looking at a light source and deciding whether it seems bright enough.
Soft lighting is often flattering, but there are plenty of portraits where stronger shadows are exactly what the photograph needs.
Using Available Light Before Changing Equipment
Move the person before changing the equipment
One of the most useful things about available light is that you can often change its effect by moving your subject.
A person standing near a large window will usually receive more light than someone positioned much further into the room. The window also appears larger relative to the person when they’re close to it, which can produce softer shadow transitions.
Move them away and both the amount and the character of the light may change. The contribution from other surfaces in the room can become more noticeable too.
Even turning someone a few degrees can make a considerable difference.
During a portrait session, I might begin by positioning the person where the light is falling well, then ask them to turn slightly towards or away from it. I’ll observe the shadows across their face and decide whether that change improves the photograph.
Sometimes I want a little more light reaching the far side of the face. At other times, I might deliberately turn the subject away from the source to produce stronger contrast.
There are also situations where moving the camera is a better solution.
You may discover that a promising lighting arrangement places something distracting behind the subject. Rather than immediately changing the light, try another camera position. You may find a cleaner background while retaining much of the lighting you liked.
These are relatively small adjustments, but they’re part of developing an eye for the photograph before becoming concerned with equipment.
Consider the light on the background as well
Portrait lighting is often discussed entirely in terms of what happens to the person’s face. But the light on the background can have an equally important influence on the finished photograph.
Imagine someone standing in open shade with a brightly sunlit area behind them.
The light on their face may be soft and pleasing, but the background is receiving considerably more illumination. If you expose for the subject, that background may appear very bright.
Sometimes that can produce a lovely, airy photograph. At other times, the bright area becomes a distraction that draws attention away from the person.
You need to decide whether the relationship between those areas of brightness supports the photograph.
You might change your camera position to include a darker background, move the subject to another part of the shade or choose to retain the brightness because it contributes to the atmosphere.
The opposite can be equally effective.
If a person is illuminated by a window while the background remains relatively dark, the difference in brightness can create a strong sense of separation without requiring an extremely shallow depth of field.
I find this particularly useful in environmental portraiture, where I may want the surroundings to remain recognisable while still directing attention towards the person.
It’s another reason to look at the entire scene rather than concentrating only on the face.
Shaping and Controlling Available Light
Learn to shape the light that’s already there
Once you can recognise what the available light is doing, you can begin making small adjustments to its character.
This doesn’t necessarily require artificial lighting.
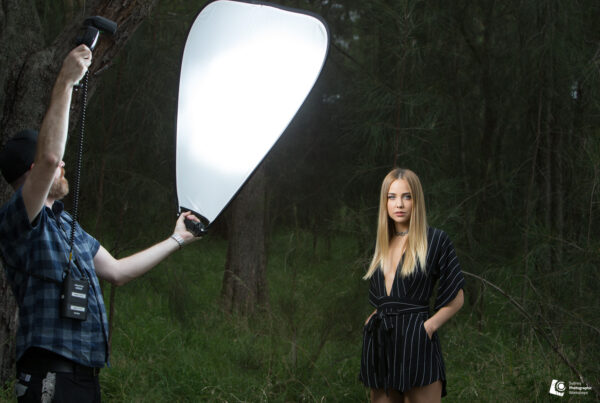
A reflector, diffuser or a piece of black material can provide quite a bit of control, particularly when you’re working with window light or relatively directional daylight.
A reflector allows you to redirect some of the existing light towards your subject.
For example, if a window is illuminating one side of someone’s face and the other side is becoming darker than you’d like, you might position a white reflector on the shadow side to return some light towards them.
The amount of fill depends on the reflector’s position, angle and surface. It needs to catch light from the source and send it somewhere useful.
This is something I demonstrate during our workshops because students sometimes assume that holding a reflector near the subject automatically improves the lighting.
You still need to look at where the reflected light is falling.
A silver reflector may provide a stronger, more directional reflection than a white one, while a white surface generally produces a subtler result.
The important part is deciding how much additional illumination you want and whether it improves the photograph.
A diffuser works differently.
Instead of reflecting light back towards the subject, you place it between the light source and the person. A suitable diffuser can spread the incoming light over a larger apparent area, softening harsh shadows while also reducing the amount of light reaching the subject.
This can be particularly useful when photographing outdoors in direct sunlight.
But even here, I wouldn’t automatically soften every shadow. Sometimes the hard light is what gives the portrait its character.
The purpose of these tools is to provide more control, not to make every photograph look the same.
Sometimes you need less light, not more
Another useful technique is negative fill.
We’ve all become familiar with reflectors as a way of adding light to the shadow side of a face. Negative fill does the opposite by reducing the amount of reflected light reaching that area.
Imagine photographing someone beside a window in a room with pale walls. The window may be providing lovely directional light, but the surrounding surfaces are bouncing enough light back onto the face that the shadows have become relatively weak.
By positioning a black panel or the black side of a reflector near the shadow side of the subject, you can reduce some of that bounced illumination.
The shadows become deeper and the face may take on a stronger sense of shape.
I find this an interesting technique to demonstrate because it changes the photograph without introducing another light source.
You’re working with the light that’s already present and deciding how much of it you want to retain.
Of course, negative fill won’t produce the same effect in every environment. A large open space with little reflected fill behaves differently from a small room with pale walls. The size and position of the black surface also matter.
As with a reflector, you need to look at the result rather than assume the equipment is doing something useful simply because you’ve placed it beside your subject.
Understanding Light Colour and Atmosphere
The colour of the light is another consideration, particularly when you’re photographing in locations with several different sources.
Daylight entering through a window may appear relatively cool compared with the warm artificial lighting inside the room. You might also encounter coloured reflections from nearby walls, curtains or other surfaces.
Those differences can affect skin tones and the atmosphere of the photograph.
Sometimes you’ll want to correct or minimise them. At other times, allowing a warm background to contrast with a more neutrally illuminated subject can produce a pleasing result.
I don’t think every light source in a photograph needs to be made identical in colour.
What matters is recognising those differences and deciding whether they’re contributing something useful.
White balance can help you control how the colours are recorded, but it can’t always remove the effect of several differently coloured light sources falling across the same subject.
It’s worth noticing those things while you’re photographing, rather than discovering them afterwards and hoping to correct everything in editing.
Knowing When Available Light Needs Additional Lighting
There are situations where the available light simply isn’t giving you enough control.
Perhaps there’s too little illumination to work at the camera settings you need, or the only useful light is coming from a direction that doesn’t suit the photograph.
You might also want to create a particular relationship between the subject and background that would be difficult to achieve with the existing light alone.
That’s when I begin considering whether to introduce another source.
A small LED, Speedlite or larger flash system can give you additional options, but I prefer to understand what the available light is contributing before deciding how to supplement it.
You may need only a small amount of fill. In another situation, the additional light might become the main source illuminating the person.
Once you understand the quantity, quality, colour and direction of light, those decisions become easier to make because you’re applying the same principles to different equipment.
I often find that the challenge in location portraiture is deciding how much of the existing light to retain and how much to change.
There’s no particular advantage in unpacking a lighting kit if the available light is already giving you the photograph you want.
A Simple Exercise in Learning to See Light
You can begin developing these skills with a camera, a willing subject and a reasonably large window.
Start by positioning someone near the window and have them face towards the light. Take a photograph and observe how evenly their face is illuminated.
Now ask them to turn approximately 45 degrees away from the window. Keep your camera position reasonably consistent and look at how the shadows change across the face.
For the third photograph, turn them a little further away. You may find the lighting becoming more dramatic as a larger portion of the face falls into shadow.
Make any exposure adjustments needed to record the subject appropriately, then compare the three photographs.
Pay attention to the direction of the light, the shape of the shadows and which arrangement best suits the person’s features and expression.
If you have a white reflector, try placing it on the shadow side of the face and observe what changes. Move it closer or alter the angle to see how much light you can return towards the subject.
If you have a black reflector or another suitable black surface, try using it to reduce the fill instead.
You don’t need to use every technique in the final photograph.
The exercise is about recognising the choices available to you and understanding the effect of each adjustment.
As you become more comfortable, repeat the process in different lighting conditions. Try open shade, late-afternoon sunlight or a room with smaller windows.
You’ll begin noticing useful lighting opportunities in places you might previously have overlooked.
Learning to See Light at Sydney Photographic Workshops
During our Portrait Photography Workshop, we begin by exploring the available light and how it can be used to photograph people in different locations. You can call us on (02) 9699 4255 or submit an enquiry through our online contact form for more information.
Students work through practical demonstrations involving light direction, subject positioning, reflectors, diffusion and other techniques before introducing additional lighting where it’s useful.
The aim is to develop a better understanding of what the light is doing, how it affects the person and what can be changed to produce a stronger photograph.
Once you develop that understanding, you can approach a new location with considerably more confidence, whether you’re working with daylight alone or bringing your own lighting equipment.